Appendix A: Installing R and RStudio
There are a few things we need to do before we can jump into using R. Some of these are obvious — for example, we need to install R! Others aren’t strictly necessary, but will make using R easier for this course and prevent typical headaches for new users.
This appendix will show you how to
Install R
Install RStudio
Create a desktop folder and make that your default RStudio folder
Verify everything is installed correctly
Optional: Install LaTeX
A.1 Install R
To install R, you’ll need to download the installation file on CRAN: The Comprehensive R Archive Network. Click this link (or type it into your browser) to go to CRAN: https://cran.r-project.org/.
At the top of the page, you should see

Click the link for your operating system. I’m going to assume that Linux users are well-versed in software installation. In the following, I’ll focus on the mac OS and Windows installations.
A.1.1 mac OS
Selecting “Download R for macOS” will take you to a page where you can download R for the mac operating system. You should see a section like the following

Two version of the macOS installation file will be shown. Both will be labeled something like R-4.X.X-YYYY.pkg, where 4.X.X will be the version of R and YYYY will be either arm64 or x86_64. Here, you’ll need to determine whether your mac uses an older Intel processor or a newer Apple M1 or M2 processor.
If you’re unsure which type of processor your mac uses, click on the apple icon in the very top left corner of your desktop and then select “About This Mac”.

A window should pop up with basic information about your mac. The type of processor you have will be shown next to “Processor” or “Chip.”
If you have a mac with an Intel processor, select the R-4.X.X-x86_64.pkg link. For M1/M2 processors, select R-4.X.X-arm64.pkg. Once you’ve selected a .pkg file, it should begin to download.
Once the .pkg has finished downloading, you’ll need to run it. In some browsers, you may see the downloaded file at the bottom of the browser. You can simply click it there to run it. Alternatively, you can open the Finder. The left column of the Finder app will show Favorites. Typically, Downloads is shown there. Click (or double-click) on Downloads and you should see your downloaded files, one of which will be the .pkg file. Click the .pkg file to install R.
The R installation app will pop up a number of different windows in sequence. Select accept, agree, continue, or ok for any windows that pop up.
Once the R installation finishes, confirm that R has been installed properly by running it. If Finder is still open, you should see the Applications folder in the left-side Favorites list. Click that, scroll down to R, and double-click it to run it. If it runs correctly, you will see a window like the following pop up:

The version number will likely be different, but that’s okay. What you’re seeing is the R console. Quit R by typing q() or quit() into the console and hit Return. If you are asked whether to save the workspace or save to .Rdata, select No. The window will disappear. You are now ready to install RStudio
A.1.2 Windows
Selecting “Download R for Windows” will take you to a page where you can download R for the Windows operating system. You should see a section like the following

Select either the “base” link or “install R for the first time.” Both will take you to a page with the download link for the installation file.

Assuming you’re running Windows 10 or higher, simply click the Download link to start downloading the installation R-4.X.X-win.exe file. Note that the current version of R will likely differ from that shown in the screenshot above.
Once the installation file has finished downloading, you’ll need to run it. In some browsers, you may see the downloaded R-4.X.X-win.exe file at the bottom of the browser. You can simply click it there to run it. Alternatively, you can open File Explorer. The left column of File Explorer should show your Downloads folder. Click (or double-click) on Downloads and you should see your downloaded files, one of which will be the installation file. Depending on whether you have Windows set up to show filename suffixes, the installation file will appear as either R-4.X.X-win.exe (suffixes on) or as R-4.X.X-win (suffixes off). Whichever is displayed, double-click it to install R.
The R installation app will pop up a number of different windows in sequence. Select yes and OK for the first two windows that pop up. Then select Next for all other windows to accept the default installation settings.
Once the R installation finishes, confirm that R has been installed properly by running it. If you accepted the installation defaults, there should be an R icon on your desktop that you can double-click. Alternatively, you can find the R app by typing “R 4” into the search bar at the bottom of the desktop. As you type “R 4”, the search window should suggest the R app with its version — e.g., “R 4.3.1”. Double-click that to run R. If R runs correctly, you will see a window like the following pop up:
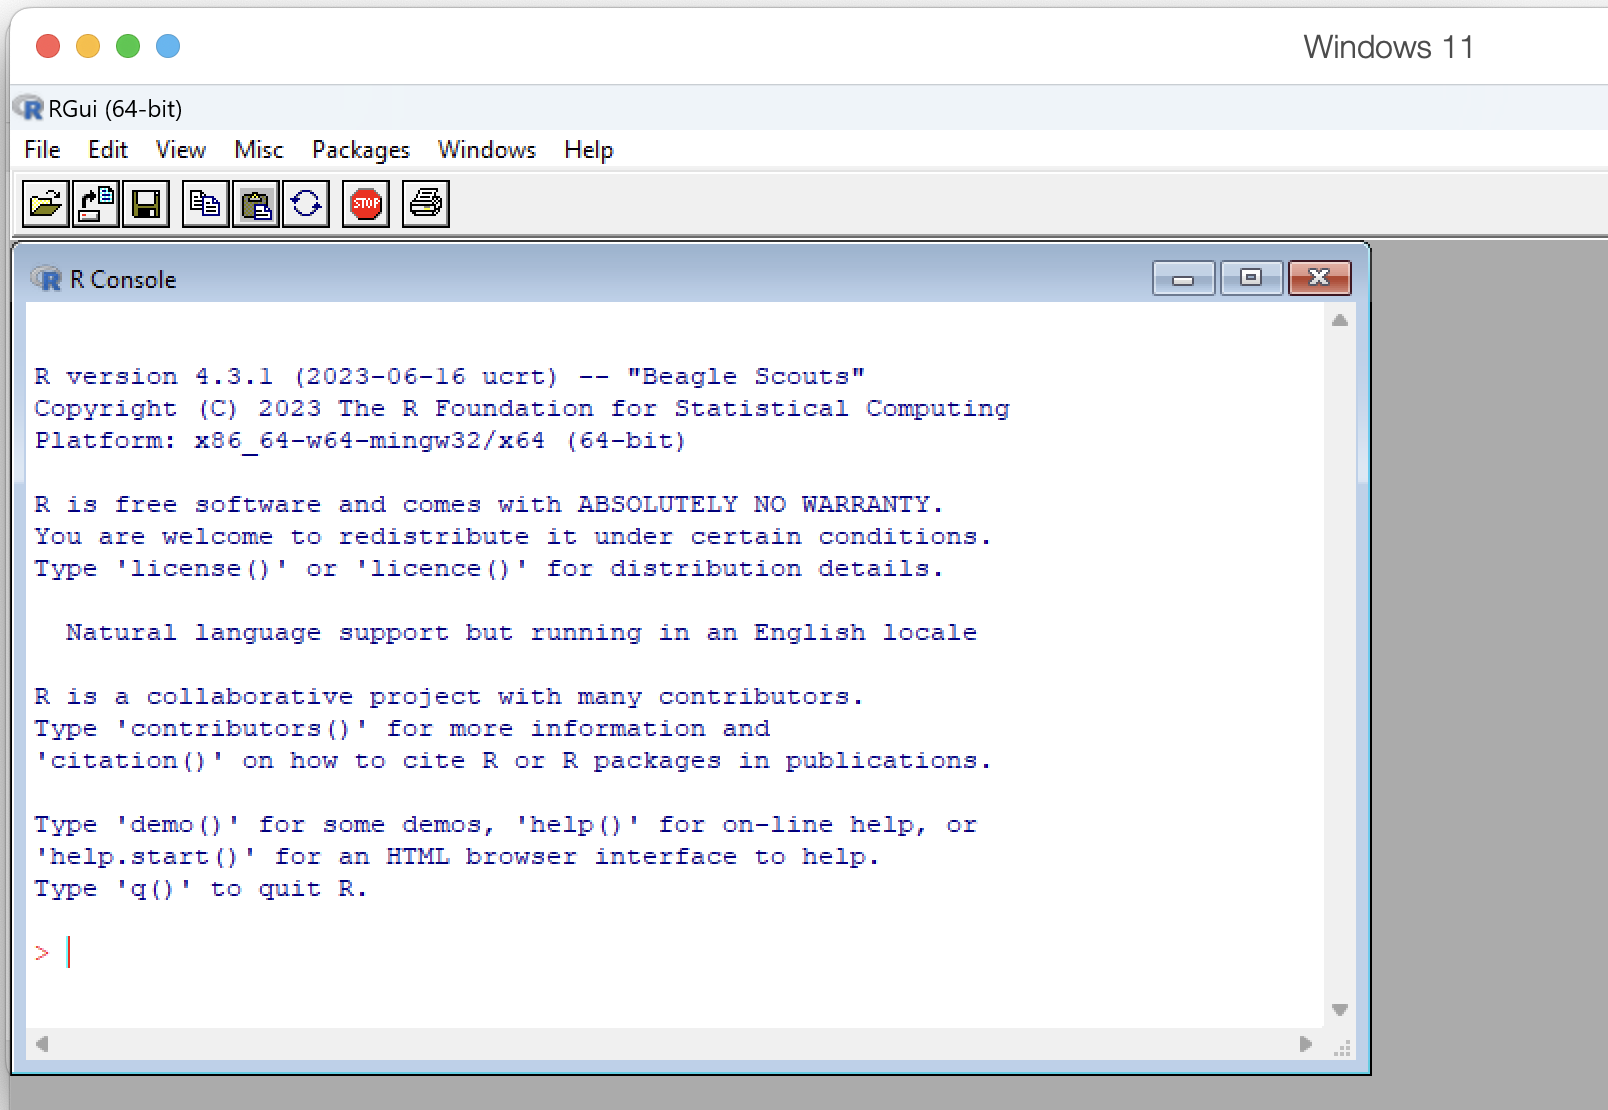
This is the R console. Quit R by typing q() or quit() into the console and hit Return. R will ask you if you want to save the “workspace image.” Select No. The window will disappear. You are now ready to install RStudio.
A.2 Install RStudio
In this course, we will use R as our statistical computing “engine.” However, as we’ve seen, the R console is quite spare. Some people like a command-line interface. Other’s prefer a user interface with more bells and whistles. RStudio provides the bells and whistles.
To install RStudio Desktop, either click the following link or type it into your browser: https://posit.co/download/rstudio-desktop/. This will take you to a page where you’ll find two steps to installing RStudio.

At this point, you have already installed R, so we can proceed to step 2: Install RStudio. The above image shows the page for the mac OS installation. Click the blue step 2 button to download the RStudio installation file. If you are using a Windows computer, the page will look identical, but the blue step 2 button will refer to Windows. Once your installation file has finished downloading, proceed to the appropriate version (mac vs Windows) below.
A.2.1 mac OS
The RStudio installation file for mac OS will be named something like RStudio-XXXX.dmg, where XXXX will be a date and numeric version. You can find the installation file either through the browser you used to download it or in your Downloads folder. Refer to the Install R section if you forgot how to view your Downloads folder.
Once you’ve found the RStudio-XXXX.dmg file, double-click it to begin the installation. The installation will pop up a window with two icons as shown below
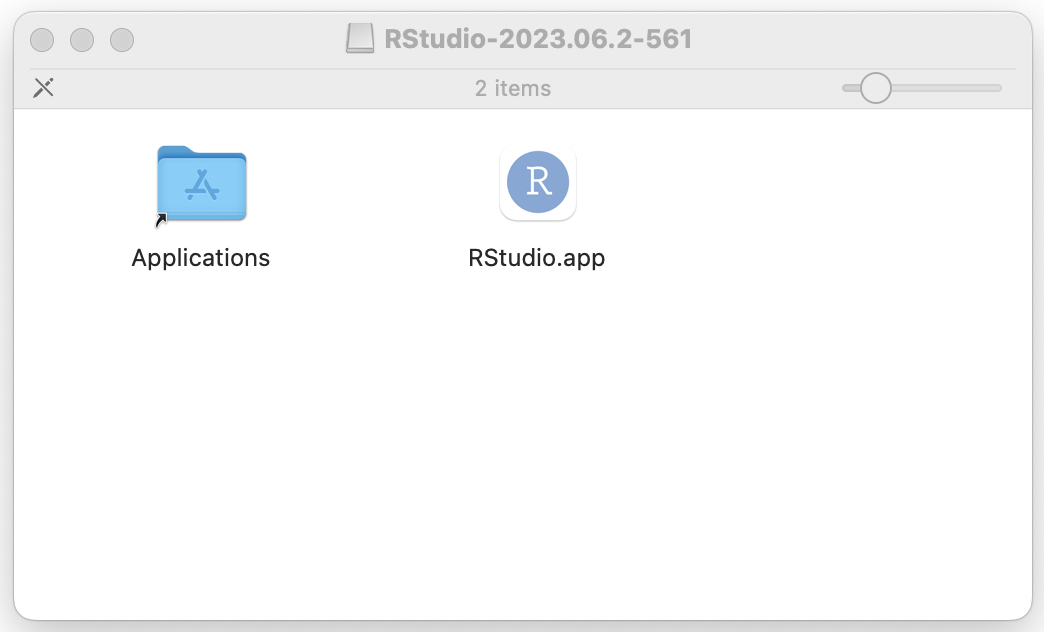
Simply drag the RStudio.app icon to the Applications folder to install RStudio. You should see another small window pop up indicating that the RStudio files are being copied to the Applications folder. If you have a prior version of RStudio installed, you will be asked what to do. Select “Replace”.
IMPORTANT: Do not run RStudio from the above window! That is only the installation file. Instead, immediately close the window with the installation files. Find RStudio in your Applications folder and run that version. If RStudio has installed correctly, it will appear as a window with three panes: the R console on the left, and two smaller panes on the right. Proceed to A.3.1 to configure RStudio.
A.2.2 Windows
The RStudio installation file for Windows will be named something like RStudio-XXXX.exe, where XXXX will be a date and numeric version. You can find the installation file either through the browser you used to download it or in your Downloads folder. Refer to the Install R section if you forgot how to view your Downloads folder.
Once you’ve found the RStudio-XXXX.exe file, double-click it to begin the installation. Similar to installing R, the installation will pop up a few windows in sequence. Accept the default installation settings. Once RStudio has installed correctly, it should tell you that and ask you to click Finish.
The installation may not automatically place an RStudio icon on your desktop. To run RStudio, start typing “RStudio” in the search bar at the bottom center of your desktop. You should see the RStudio application suggested. You can double-click on it to run it.
The first time your run RStudio, it may ask you which version you’d like to run.
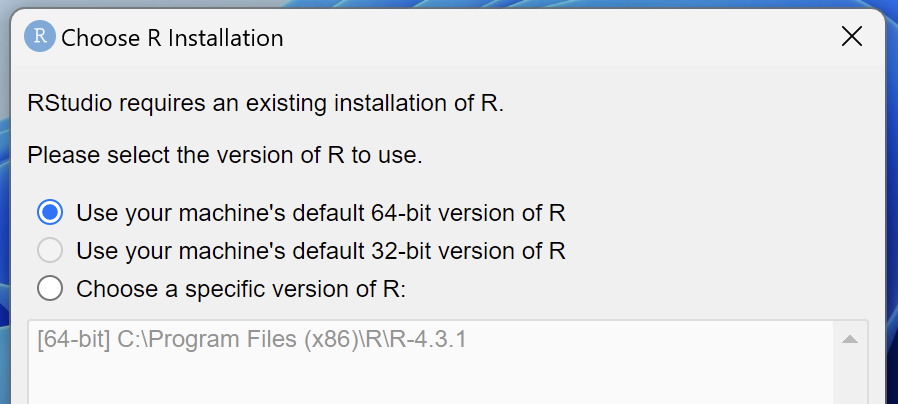
Assuming you have a Windows computer that is less than three years old, you should select the default 64-bit version of R and then click OK. You may also be asked if you will allow RStudio to send crash reports back to them. Select which ever option you prefer.
If RStudio has installed correctly, it will appear as a window with three panes: the R console on the left, and two smaller panes on the right. Proceed to the next section to configure RStudio.
A.3 Create Course Desktop Folder and Configure RStudio
This next step isn’t strictly necessary to run R and RStudio. However, I have found that it simplifies the R workflow in this course. In this section, we’ll
Create a desktop psci200 folder and
Configure RStudio so that it always opens in that folder.
A.3.1 Create Course Desktop Folder
Whether you’re using a mac or a Windows computer, the procedure is similar. On an open area of your desktop, use two fingers to single-click. That should pop up a very small window.
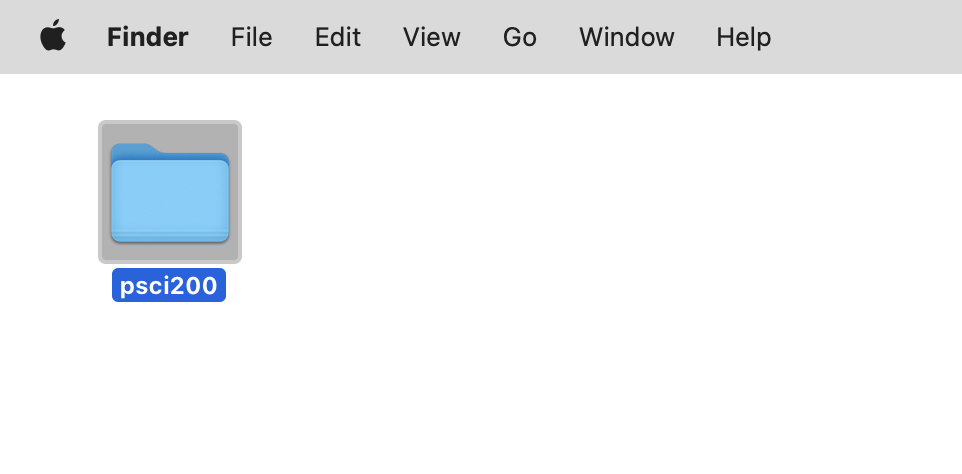
On a mac, you should see New Folder at the top of that small window. Select that. It will place a folder on your desktop with the name “untitled folder”. Single click anywhere on the name “untitled folder” and the name should become highlighted. Replace the folder name with “psci200” — exactly as spelled here but without the quotes. No spaces. No uppercase letters. Your desktop folder should look like
On a Windows computer, after you single-click with two fingers, the small window will have an option New. Move the mouse pointer over that and you’ll see an option for Folder. Select Folder. It will place a folder on your desktop with the name “New folder”. The title will be highlighted. Simply type “psci200” — exactly as spelled here but without the quotes. No spaces. No uppercase letters. Your desktop folder should look like
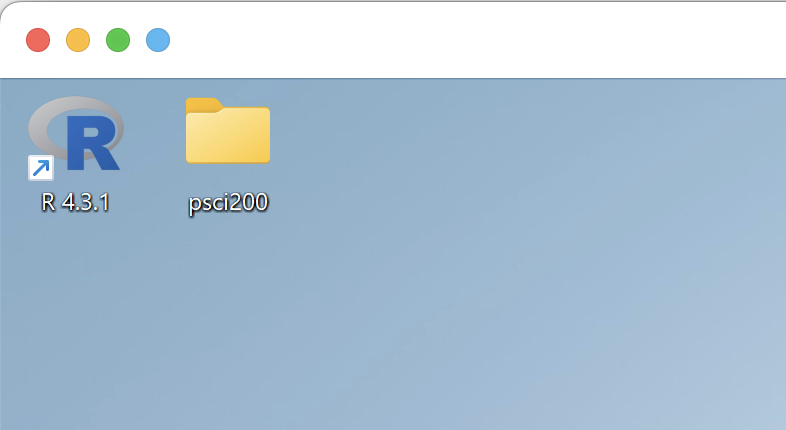
Whether you’re using a mac or a Windows computer, whenever you download a dataset or an example R script, immediately move it to the desktop psci200 folder.
A.3.2 Configure RStudio’s Default Working Directory
In this next step, we’ll configure RStudio so that whenever you start it, it will open in the psci200 folder and you’ll be able to find the files you’ve previously downloaded and moved there.
The menus and settings are the same for the mac and for Windows, so I’ll demonstrate using images from the Windows version of RStudio. First, make sure RStudio is running and is the active window. At the very top, you’ll see the menu item Tools. Select Tools and then (at the bottom) Global Options.
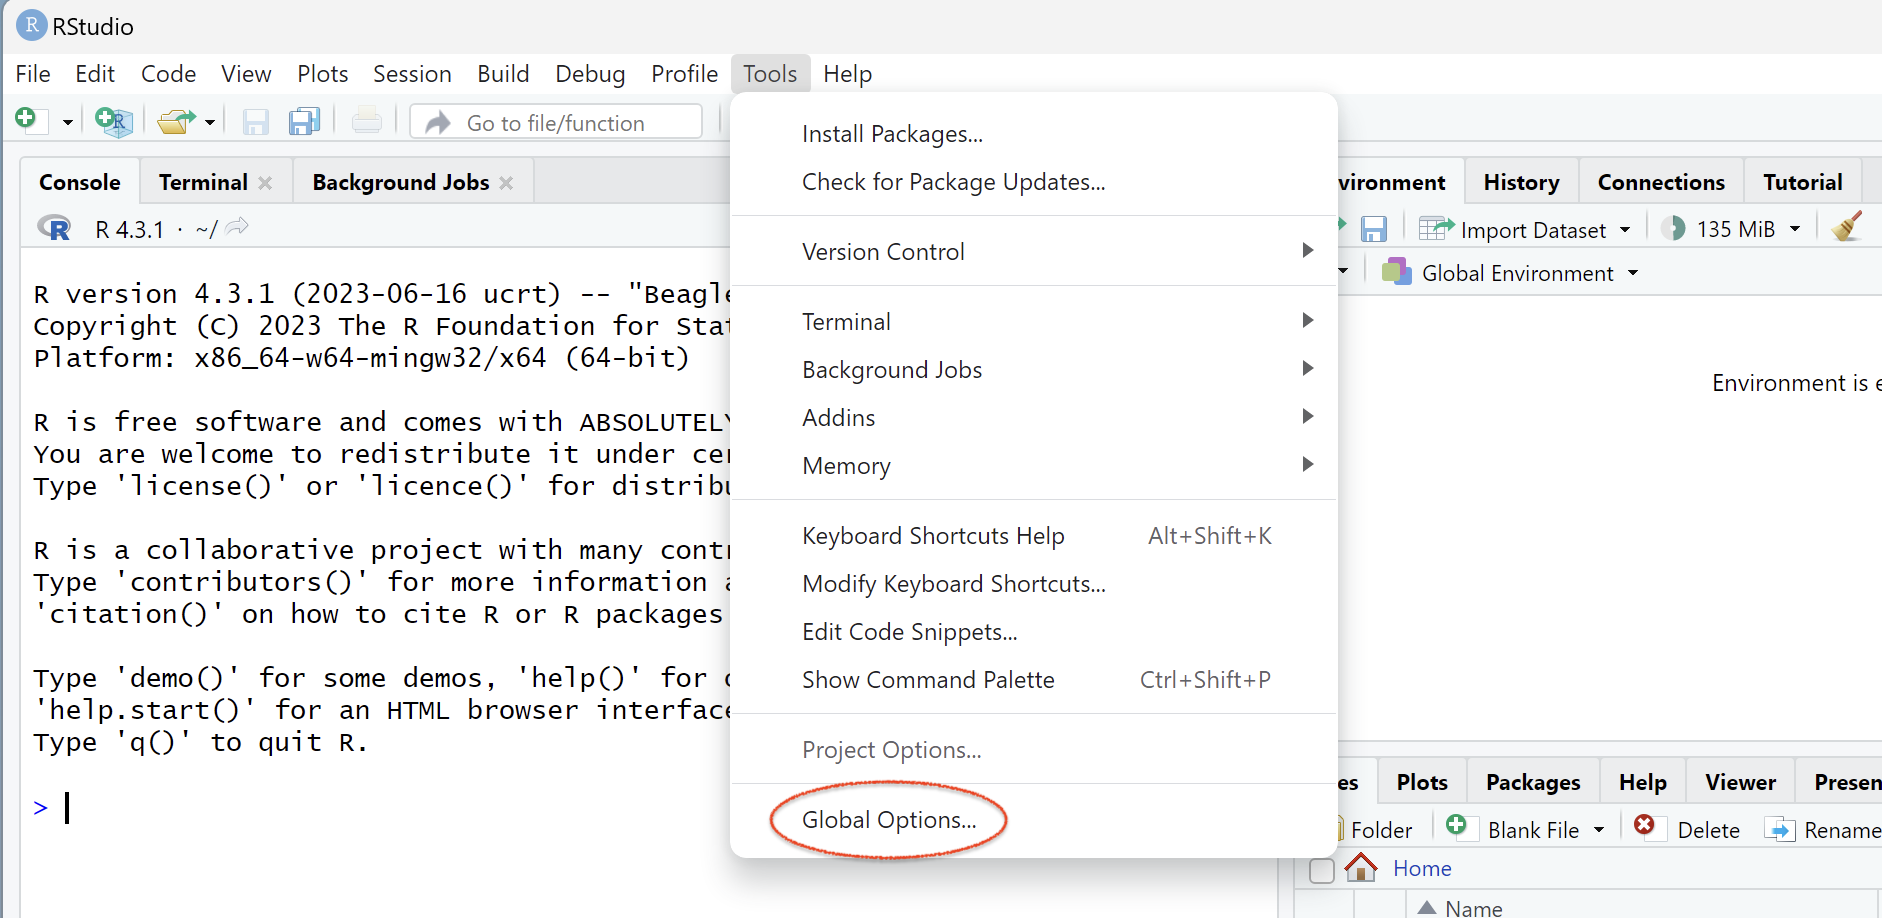
That will pop up a window like this
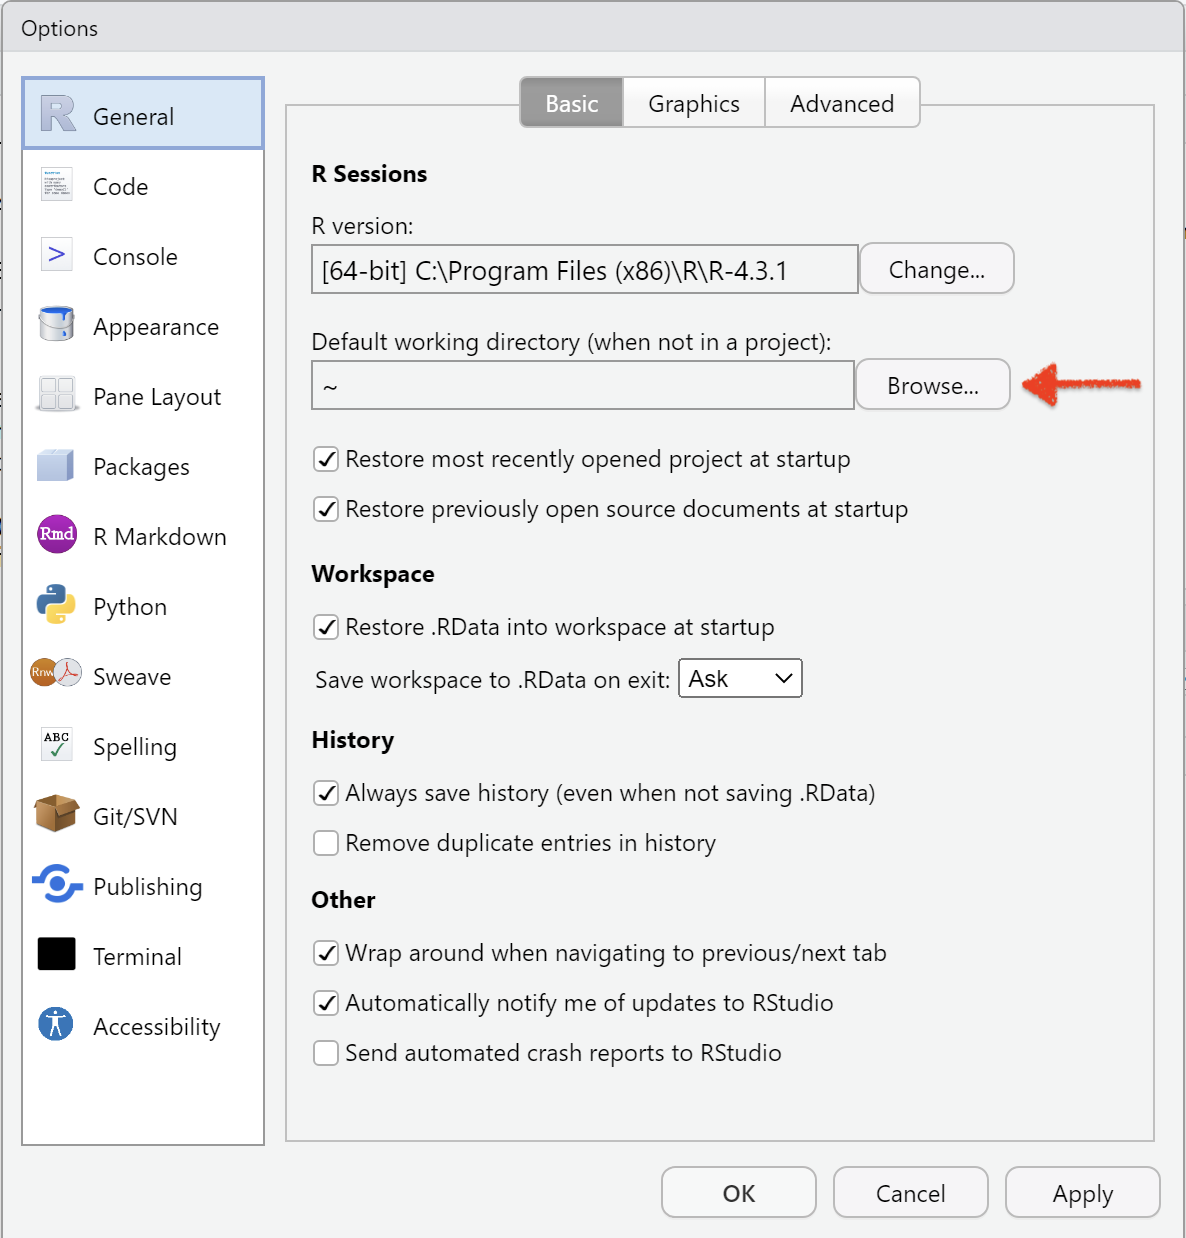
Notice the item that says “Default working directory (when not in project):” This is how we’ll configure RStudio so that it always opens in your desktop psci200 folder. We need to provide RStudio the path to the psci200 desktop folder.
Windows. Use two fingers to single-click on the desktop psci200 folder. A menu should drop down

Select Properties.
In the case of my psci200 folder, this is what Properties shows
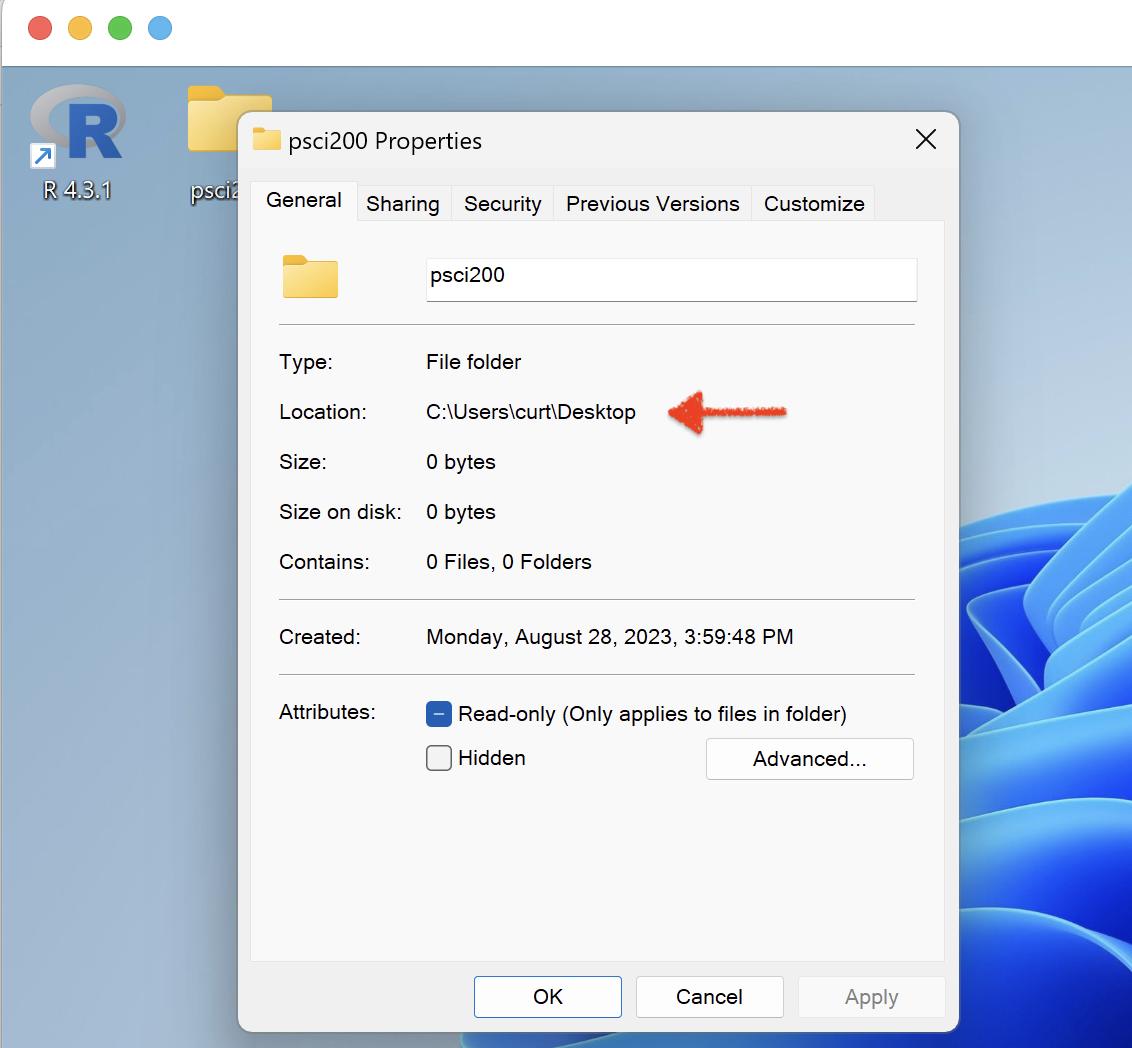
For Windows, RStudio needs the combination of the Location item and the folder name: C:\Users\curt\Desktop\psci200.
Now, to configure RStudio, we return to the Global Options window:

Select Browse next to the “Default working directory” option. That will bring up File Explorer. At the top of File Explorer, type the path name you found for your desktop psci200 folder
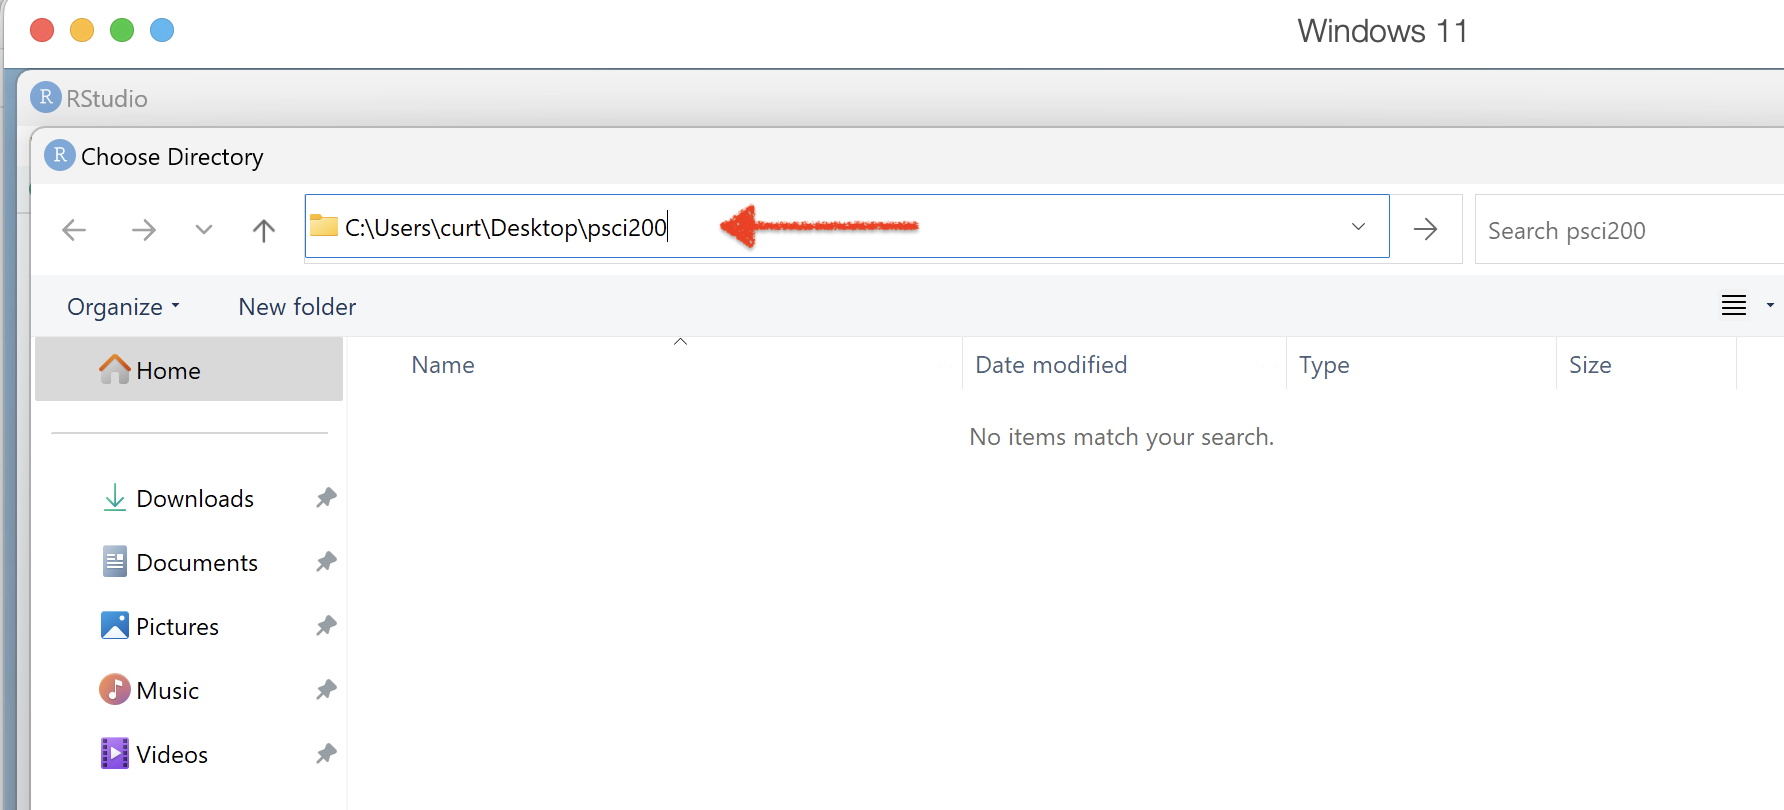
and then click Open at the lower right of File Explorer. The Global Options window should now show the path to your desktop psci200 folder
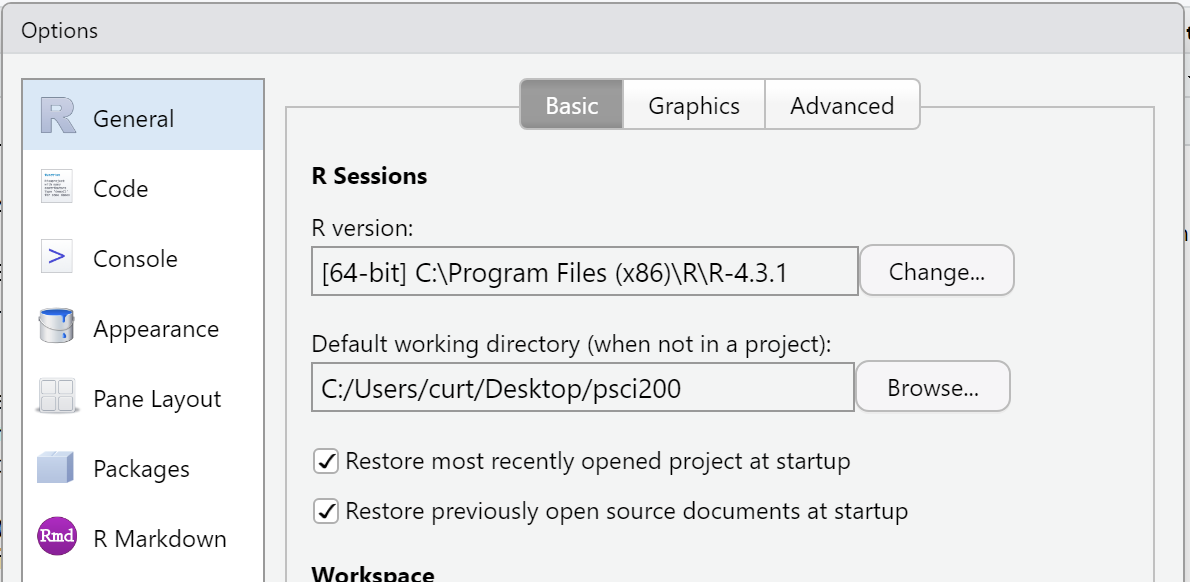
Lastly, click Apply and then OK at the bottom of the Global Options window.
mac OS. The process for finding the path name on a mac is quite a bit easier. From the Global Options window, click on Browse next to “Default working directory”. That will open the Finder. Typically, Desktop is an option in the left-side column. Click Desktop and you should see your psci200 folder. Click your psci200 folder and then Open. The path name will look slightly different than in Windows case. However, it should contain your username, “Desktop”, and “psci200”. Click Apply and then OK at the bottom of the Global Options window.
Once you have set the default working directory, RStudio will open in your psci200 folder whenever you start it from the menu or desktop.
A.4 Verify R and RStudio Installations
Your homework submissions for this course will require you to compile (or “knit”) your R script or R notebook. This process runs R and, if there are no errors, creates nicely formatted output in either html or as a Word document. We’ll attempt to do that now with an example R script and dataset.
A.4.1 Download Test R Script and Dataset
Download the R script verify.R and move it to your psci200 desktop folder. Note: If clicking on the link simply displays the R script in your browser, two-finger click on the webpage and select Save As. Save the file as verify.R in your desktop psci200 folder.
Download the R dataset household.rdata and move it to your psci200 desktop folder.
Both files should be spelled exactly as you see them above. If either file has (1), (2), (3), etc appended to it, that means you’ve downloaded it multiple times. Make sure the file you move to your desktop psci200 folder is spelled exactly as above. If your computer doesn’t show suffixes, then you won’t see the .R or .rdata extensions.
A.4.2 Verify Default Working Directory
If RStudio is running, exit RStudio. Do not save the workspace image (.Rdata). Now restart RStudio. If you have configured the default working directory correctly, the Console tab should show the name of your desktop psci200 folder. In my case, it looks like
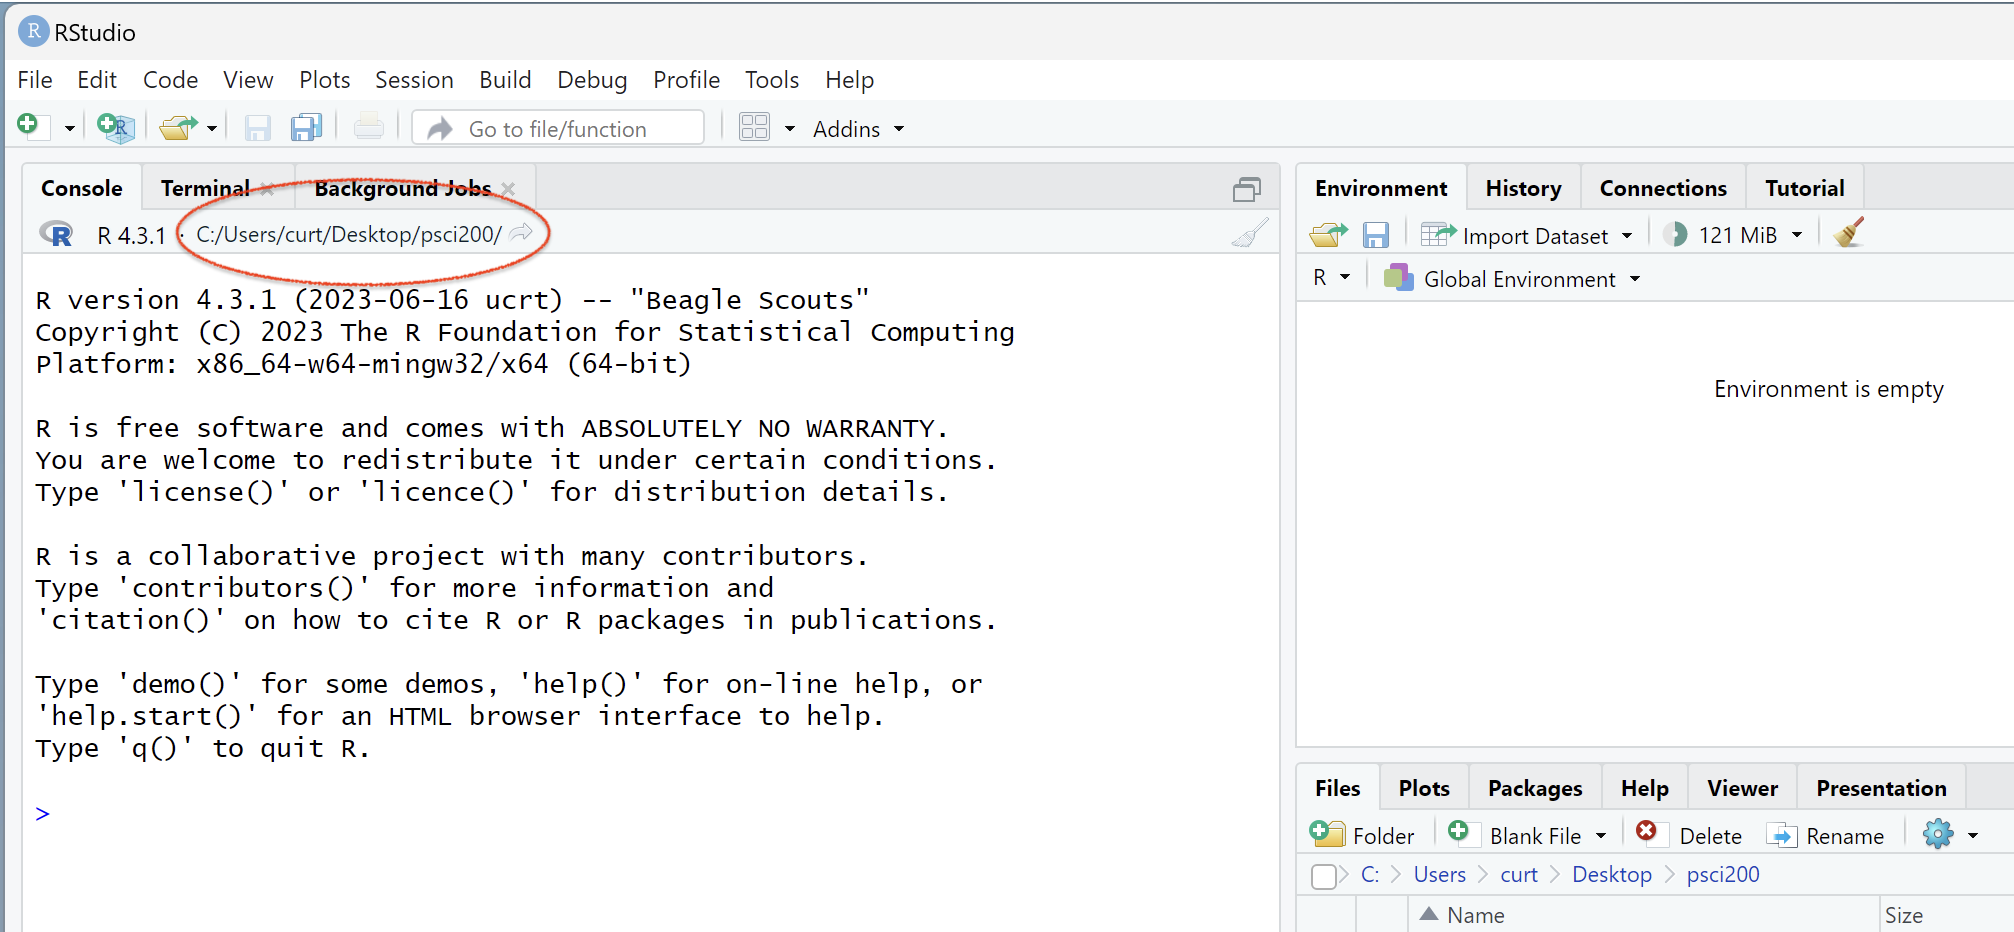
If the path name for your desktop psci200 folder is not shown at the top of the Console tab, return to Tools >> Global Options and work through the previous section to set the default working directory. Then return here and repeat this step.
A.4.3 Open Test R Script
Open the downloaded R script by selecting File >> Open File or by clicking on the yellow folder circled in the image below.
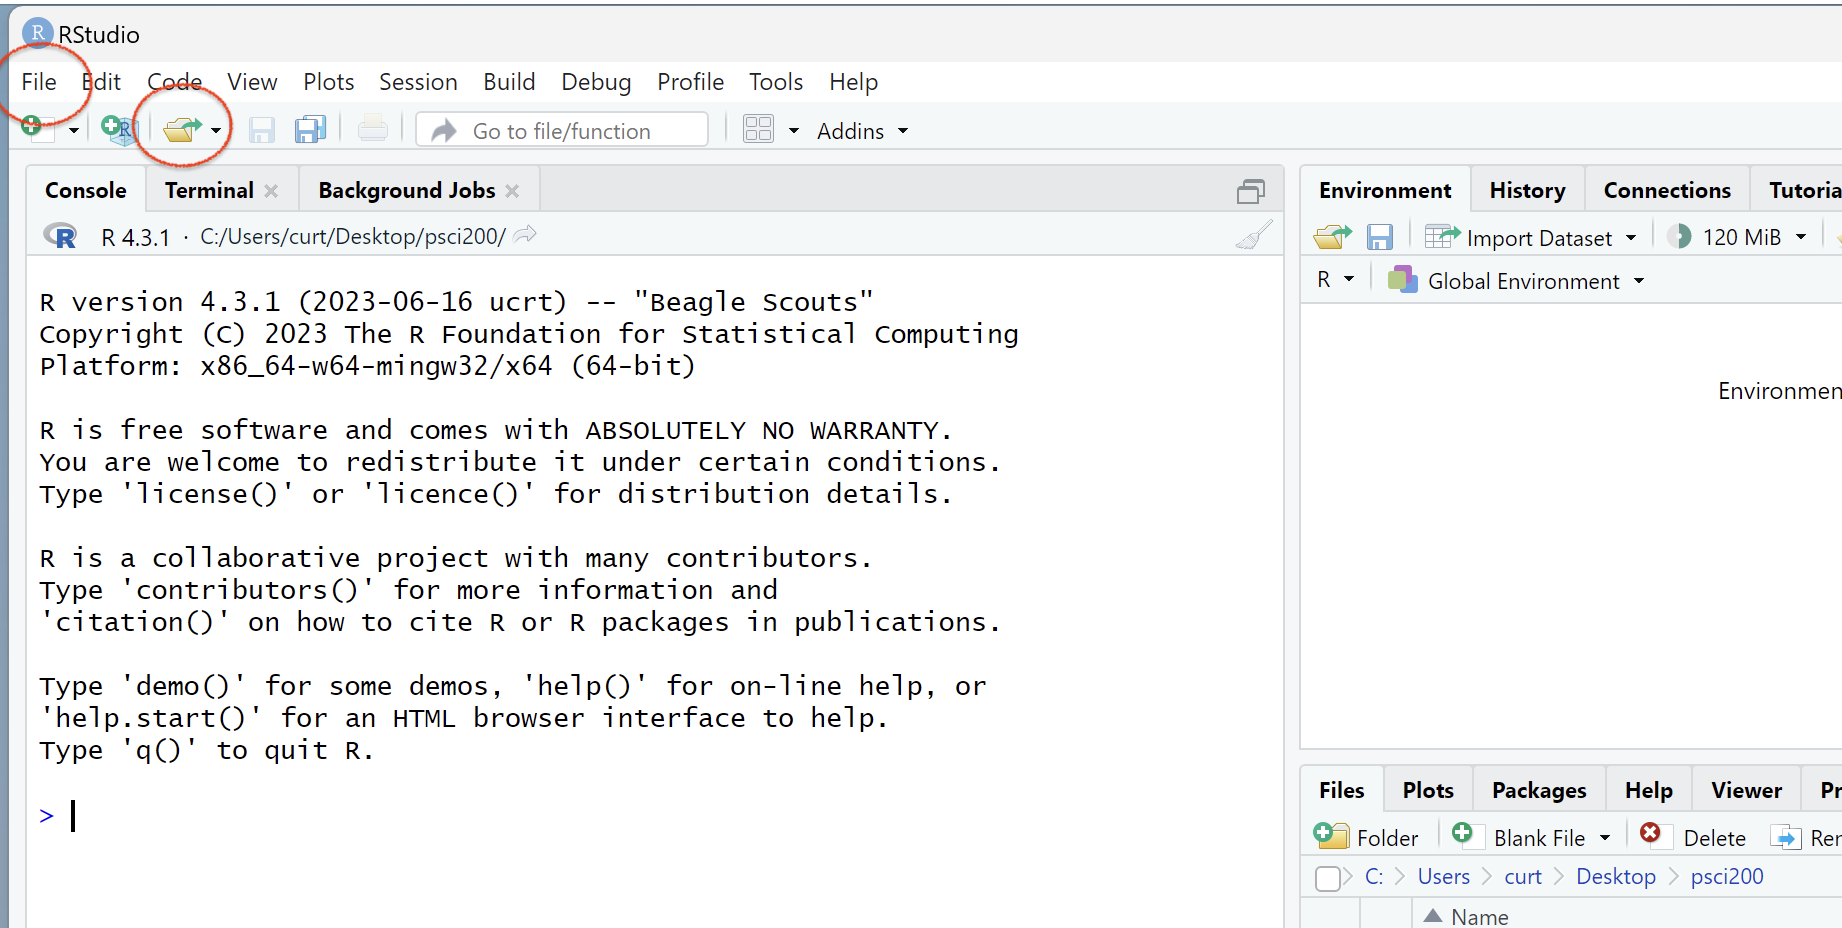
If you have configured your default working directory correctly and if you have moved verify.R and household.rdata to the desktop psci200 folder, you should see both files in the window that pops up. Select verify.R and then Open.
You should then see something like this
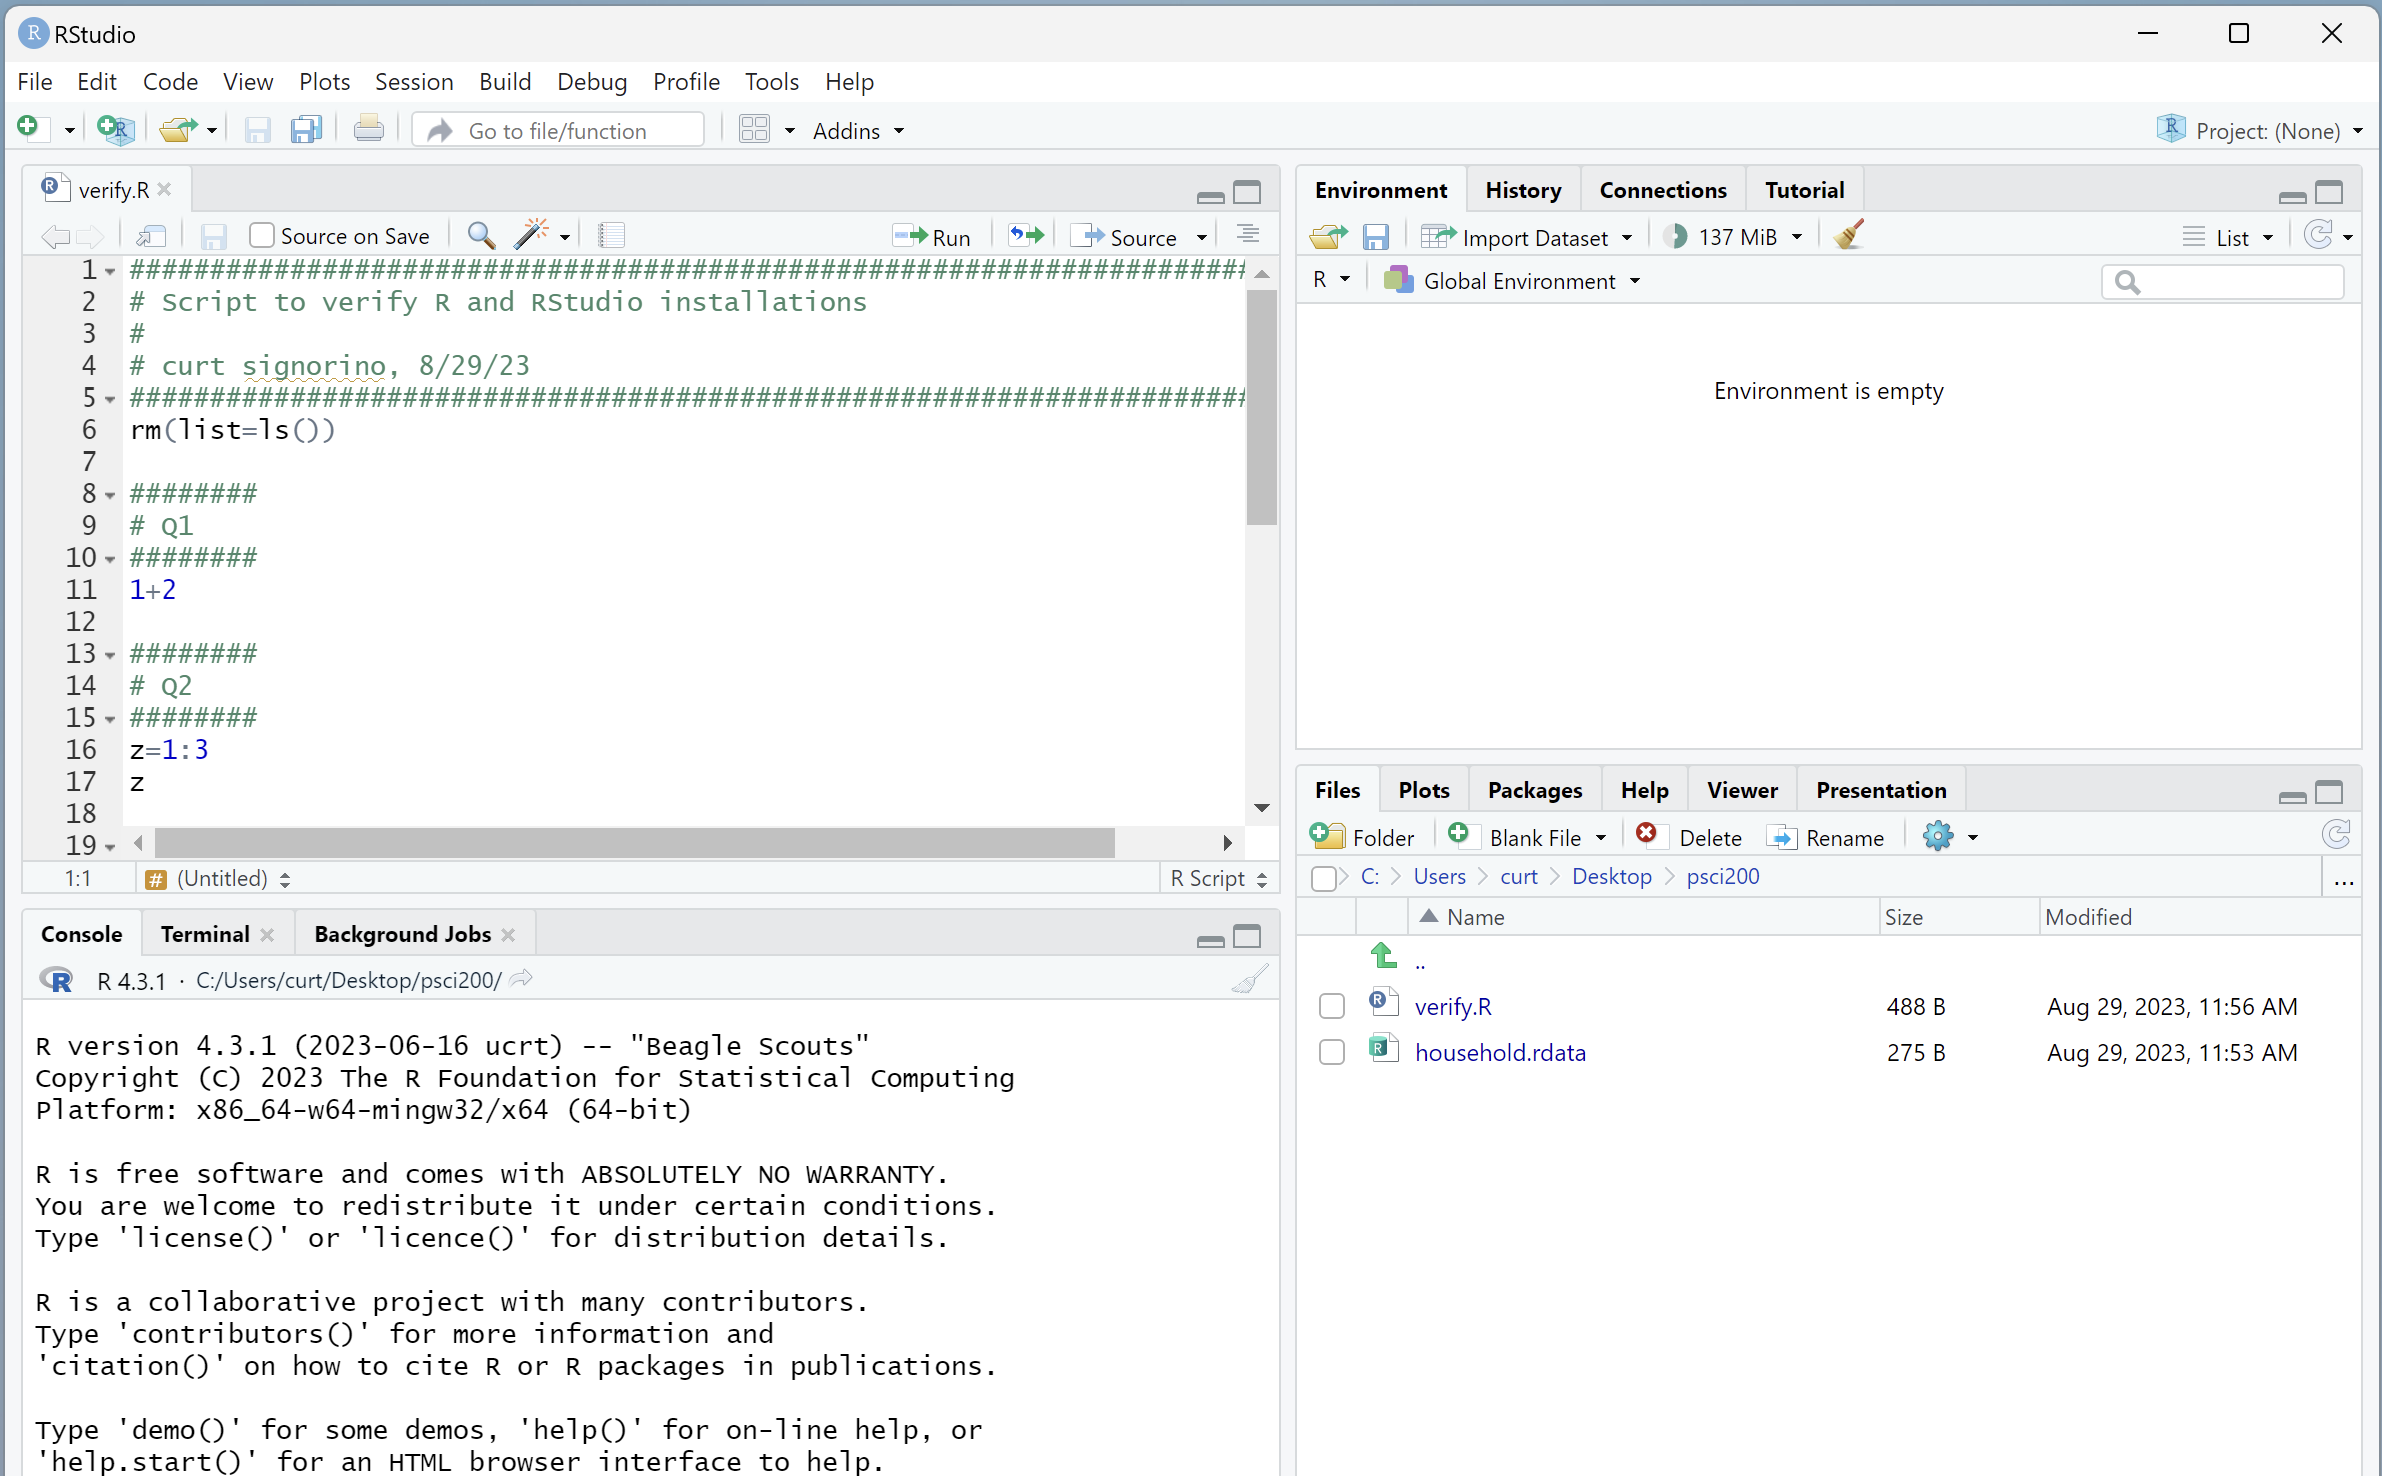
The Console pane will have moved to the bottom. Above it, RStudio will have opened verify.R in an editor pane. At this point, we won’t work through the elements of the R script. It is a toy example corresponding to how homework answers might be formatted. It performs some simple calculations and assignments, loads the household data, and then performs a few operations on the data.
A.4.4 Install Rmarkdown Packages and Verify Compilation
The final verification step is to compile the R script. This will run the commands in the R script and will produce a nicely formatted version of the results.
Normally, when we compile the R script, we will select File >> Compile Report from RStudio’s top menu. It will ask us which format to compile to: html, pdf, or Word.
However, if this is the first time you’ve installed RStudio, it will almost certainly ask you if you would like to install the necessary packages to compile your R script
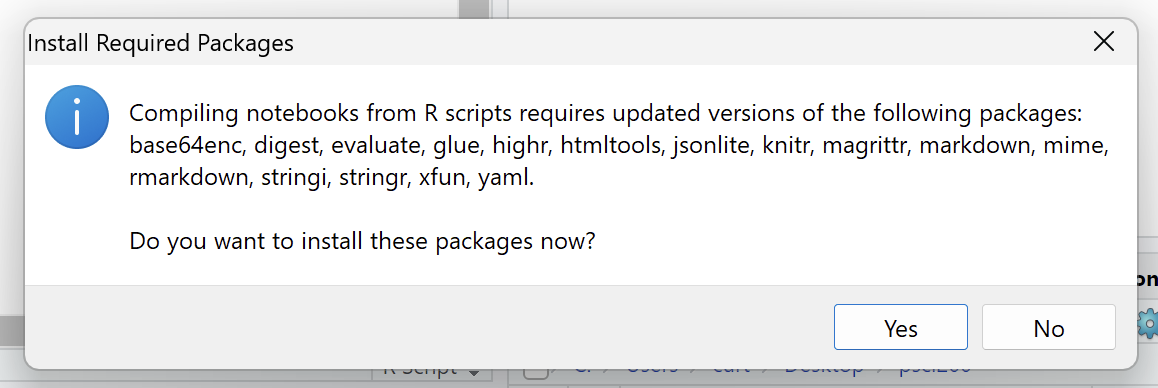
Select Yes. At this point, you’ll see (in the Background Jobs tab) RStudio downloading and installing a number of packages. There will be a progress bar. Sit tight or grab a coffee until RStudio has finished installing these packages. If everything installs correctly, you’ll only need to do this once after installing RStudio. When you try to compile an R script hereafter, you should not have to install the packages.
The next step will determine if the packages installed correctly. When RStudio finishes the package installation (with or without errors), it doesn’t actually compile your R script this first time. We need to select File >> Compile Report again.
If the packages did not install correctly, RStudio will ask you again if you want to install the packages or if you want to install an updated version of rmarkdown. Usually, selecting Yes will result in another faulty installation. You can try File >> Compile Report once more, but RStudio will likely give you the same message. If this occurs, install the packages from the console window by typing
If you are asked for a CRAN mirror, simply select one near you. As before, this may take awhile to install. If you continue to receive error messages, please see the professor or TA’s.
Let’s assume the packages installed correctly at some point in the above steps. When you select File >> Compile Report, RStudio will ask you to select the format for the output
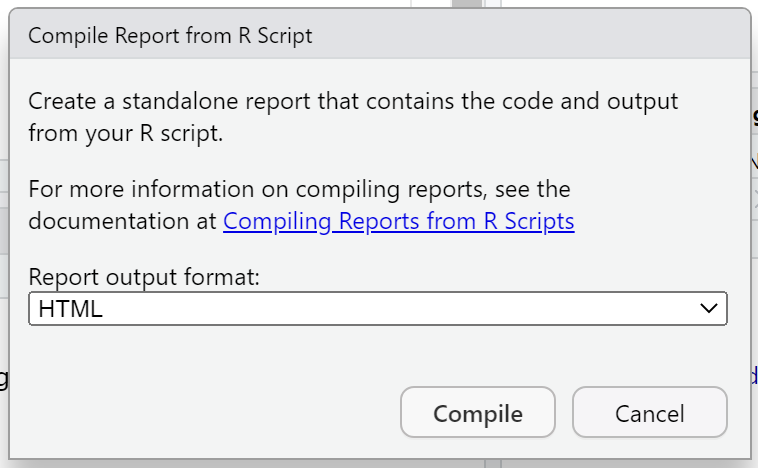
Select HTML and then Compile. If you have configured RStudio correctly and moved verify.R and household.rdata to your desktop psci200 folder, you should not see any error messages during compilation. In many cases, RStudio will automatically display the compiled output in your default browser. For example:
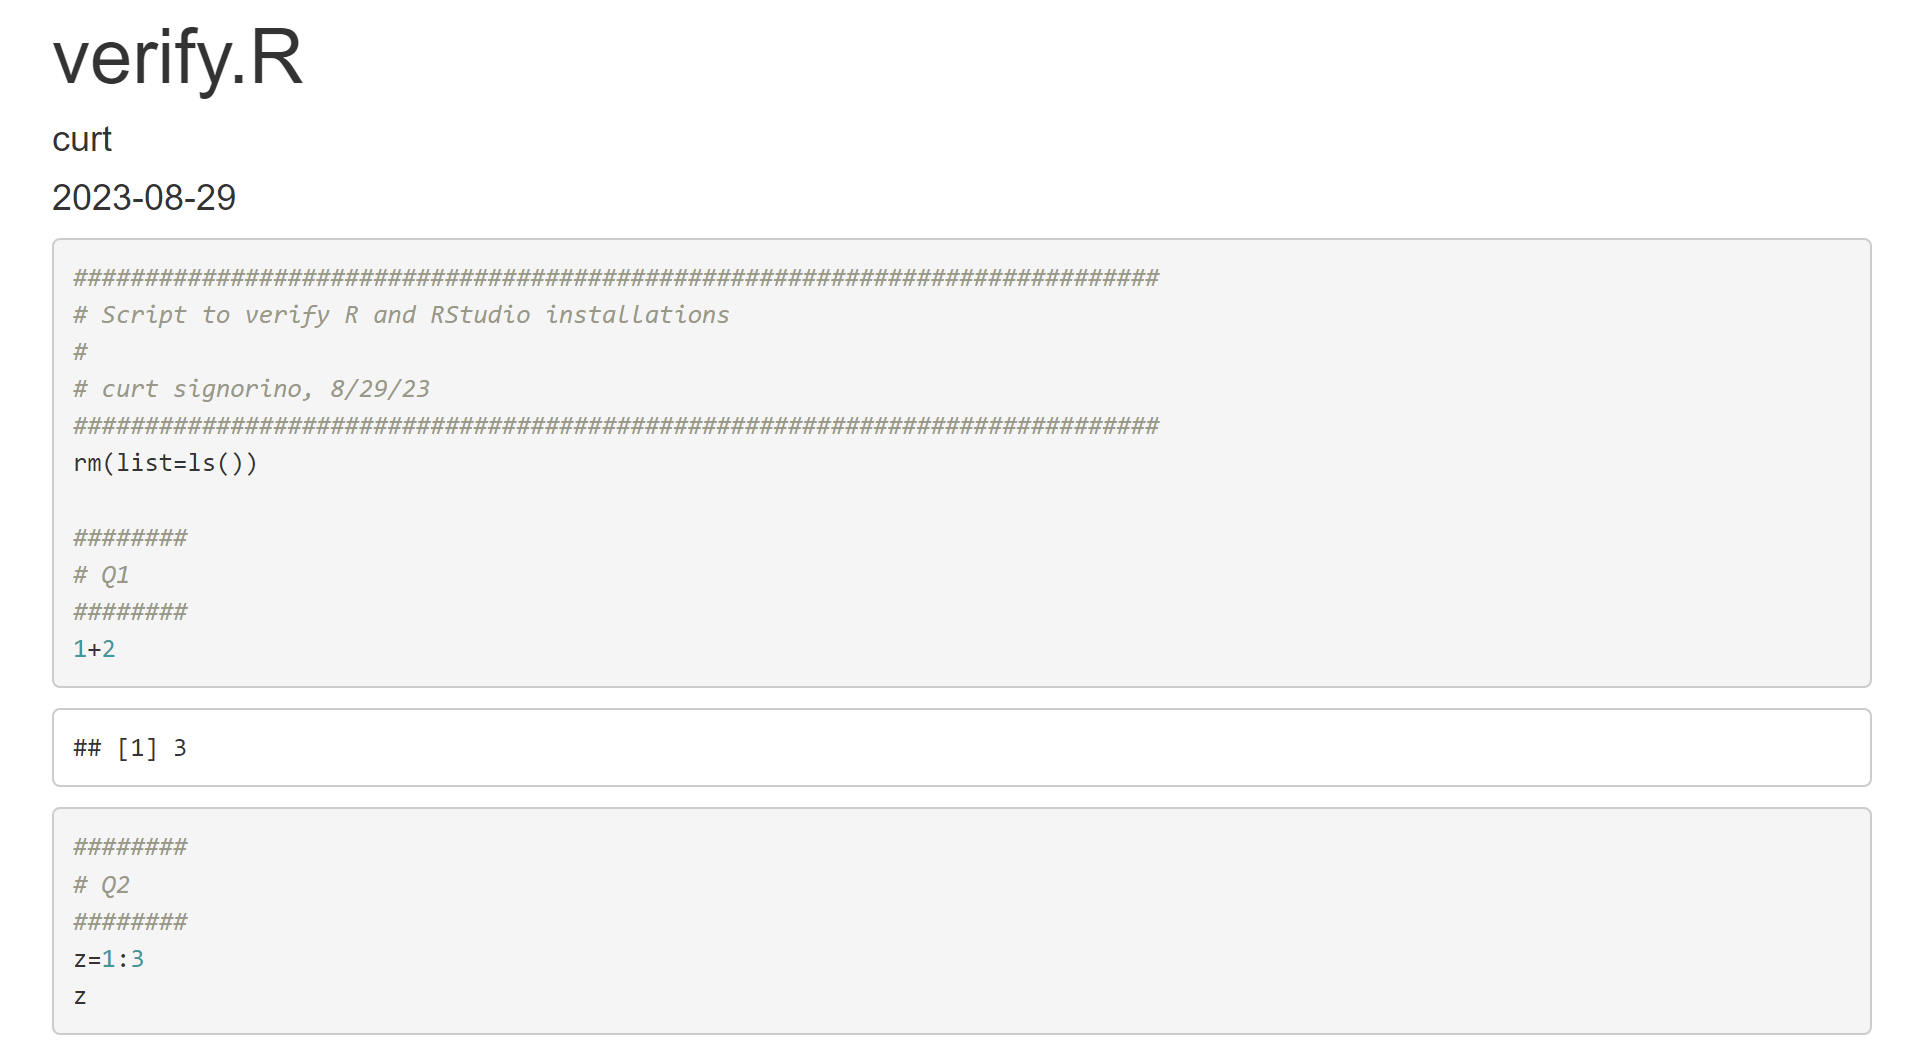
In some cases, RStudio may not automatically display the compiled output. To view it, check the Files tab in the lower right pane.
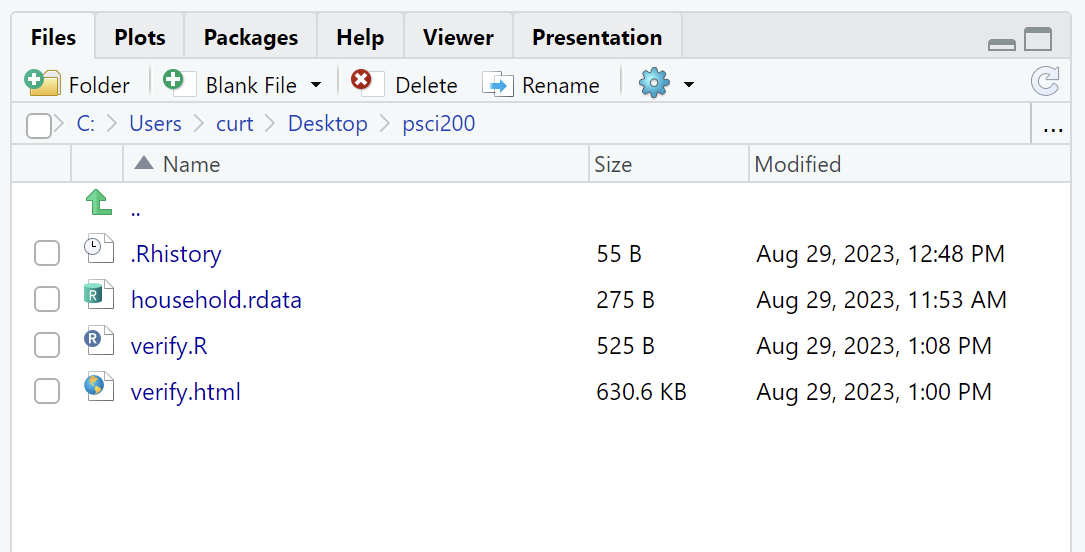
Notice the file verify.html. That is the html output from compilation. Single click on it and select View in Web Browser. The output should look like that shown above. You can also find verify.html in your desktop psci200 folder.
If, using the above steps, you are able to load verify.R and compile it to verify.html, then you have correctly installed R and RStudio.
A.5 Optional: Install LaTeX
LaTeX is a powerful text formatting language. It is widely used for writing papers or creating presentations involving mathematical symbols and expressions. Unless you want to compile an R script or R notebook to pdf, you do not need to install LaTeX. That said, some people like the compiled pdf output over the html output. Moreover, if you would like to learn how to incorporate mathematical symbols in R notebooks (or R markdown), then you should install LaTeX.
Note: Please work through all previous sections of this appendix — R & RStudio installation, setting the default working directory, and verifying the installations — before proceeding with LaTeX installation.
To install a minimal version of LaTeX, we will use the tinytex package. To install the tinytex R package, type the following in the R console and hit Return.
Next, to install the tinytex version of LaTeX, execute the following in the R console:
Depending on your internet speed, this step can take a few minutes.
Once this is finished, verify that everything is working correctly by opening verify.R and compiling it to pdf. Make sure verify.R is open in RStudio and then select File >> Compile Report. When the window pops up, use the dropdown to change the output format to PDF. Then click Compile.
If it compiles correctly, RStudio may automatically display the pdf output. If it doesn’t, look to the Files tab in the lower right pane.
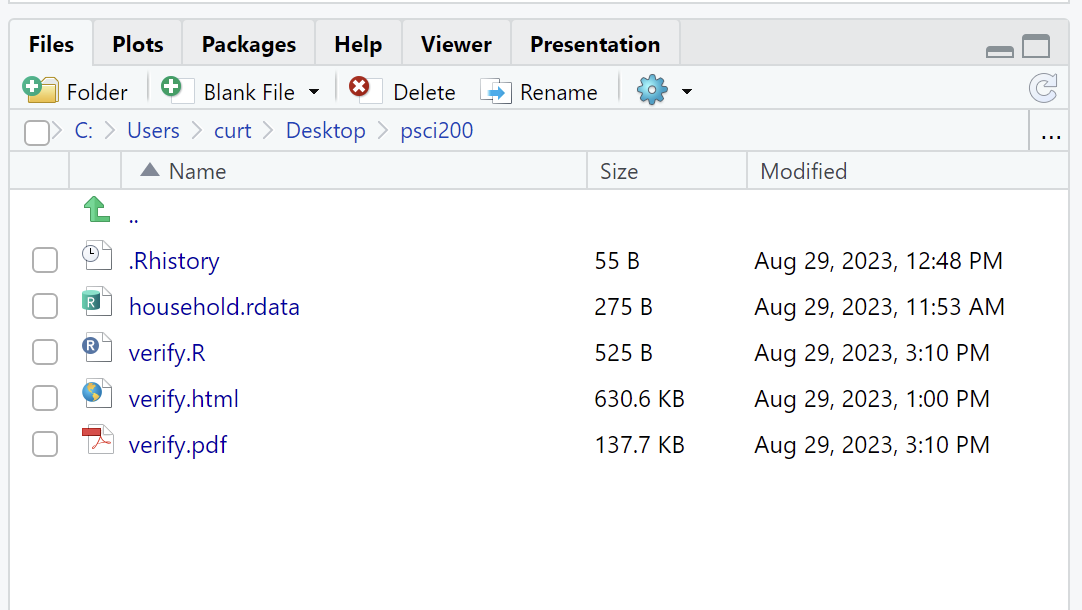
You should see verify.pdf. Click the file to view it. The pdf output will look similar to the html output with minor differences.